Tuesday, June 23, 2009

Momma Lovell's homemade bread


In a microwave-safe bowl combine:
  • 3 c. milk (can be substituted with water for very little flavor/texture difference, as we learned on accident.)
  • 9 T. shortening
  • 4 T. sugar
  • 2 T. salt

Microwave until shortening is melted. Let sit for a few minutes.

In KitchenAid mix:
  • 2 c. water
  • 2 T. yeast
  • 4 T. sugar
  • 4 c. flour
Let sit until mixture starts to grow (about 5ish minutes).

Alternately add shortening mixture and 7 cups flour to the yeast mixture. (Flour measurement is an estimate. Add until the dough starts to pull away from the side of the bowl.) Let knead for 5 minutes.

Cover with towel and let rise for 1 hour.

Split into 5 small loaves (if you have small loaf pans. Probably 3ish normal sized pans). Roll into an elongated oval with a rolling pin (to get out air bubbles), then roll up like you would do a cinnamon roll. Pinch the seam together and fold in the ends. Place in a greased loaf pan.

Let raise (covered with a towel) in loaf pan until approx. the size you want. Then place in a preheated oven (350 degrees) and bake for 35 minutes, or until golden brown on top.

Immediately remove from pan and place on a cooling rack or a towel and butter the top of the loaves.

***Note: This recipe did not fit in my KitchenAid. To compensate, we split the recipe in half. While the dough of the first half was kneading, I started the microwaving the stuff for the second half. I let the first half start to raise in a separate bowl and immediately put the stuff in the KitchenAid for the second half. When it was done kneading, I added it to the bowl with the first half in it, and briefly kneaded the two together, then let them rise together.


Recipe courtesy of Mom Lovell

Brownies (with Symphony variation)

These are my favorite brownies in the world. They're really rich and moist and chocolaty.

Ingredients:
  • 1 2/3 c. granulated sugar
  • 3/4 c. butter or margarine, melted
  • 2 T. water
  • 2 large eggs
  • 2 tsp. vanilla extract
  • 1 1/3 c. all-purpose flour
  • 3/4 c. NESTLE TOLL HOUSE Baking Cocoa (yes, I got the recipe off the back of the cocoa box)
  • 1/2 tsp. baking powder
  • 1/4 tsp. salt
Instructions:
  • Preheat oven to 350. Grease a 9x13 baking dish.
  • Combine dry ingredients.
  • Mix in wet ingredients.
  • Spread into prepared pan.
  • Bake for 18-25 minutes, or until toothpick inserted in center comes out slightly sticky.

My favorite variation:
  • Spread half of batter into pan.
  • Lay three 1-lb Symphony bars across the top.
  • Spread rest of batter on top. It will barely be enough to cover.
  • Sprinkle top with crushed toffee bits.
  • Bake as directed above. (Note: the toothpick will come out with melted chocolate on it from the candy bar. Only stick in partway to test for doneness.)
  • Let cool completely, else the melted chocolate may burn your mouth, or at the very least, run all over everything.

Friday, June 19, 2009

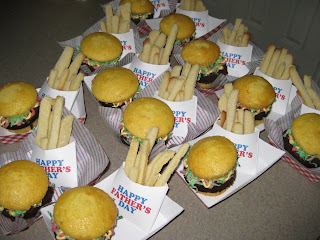
Cupcake burger and cookie fries

I stole this idea from Bakerella, I'll admit. Heck, I'll even give her all the credit. The woman is brilliant. But since I ended up doing half of mine from scratch and she did hers from a mix, I figured I'd put the recipes I used on here, just in case you, like me, want to make these, but don't have all the mixes nor time/resources to go to the store to buy some.


Sugar Cookie Fries. Note: Sugar Cookie dough needs to be refrigerated when not being used. This recipe made 3 cookie sheets worth of fries for me, but you can have one batch out of the fridge at a time, else it gets too soft to work with.

Brownies

Cupcakes:
I used a mix. But was going to use this recipe.

Frosting:
Store-bought. For the record, regular red food coloring (the cheap stuff most people have) doesn't make red frosting. It makes pink frosting. Pretend it's fry-sauce instead?

Lettuce:
Coconut colored with green food coloring.


For full instructions, be sure to visit Bakerella's blog. And make sure to print off the boxes and papers; they just make all the difference in the world.

Thursday, June 4, 2009

Pizza Recipes


Here is a very yummy recipe for Garlic Chicken Pizza.

"This is a recipe that is used at the Papa Murphy's take-and-bake pizza chain. This is just like the original and oh so tasty."

Sauce
  • 1 Cup of Ranch dressing
  • 1 Tablespoon of minced garlic (garlic in a jar is perfectly fine)
Toppings and Crust
  • 1 Cup of cooked, diced chicken
  • 1/2 of a red onion (cut in rings)
  • 1/2 of a tomato (chopped)
  • 1/2 a cup of sliced mushrooms
  • 1 cup of mozzarella cheese (shredded)
  • 1 pizza crust (store bought or homemade)
Directions
  • Mix the ranch and garlic together and put on the crust
  • Top with chicken, onion, tomato, mushrooms, and cheese
  • Bake at 350 degrees for 15 minutes or until crust is done and cheese is melted
  • Top with Parmesan cheese
My Additional Directions
  • I put the sauce on the half cooked pizza crust and then topped with cheese. Putting the cheese on first helps keep the toppings all in place as there is liquid in the tomatoes. Otherwise, they would just slide off your pizza when you picked it up to eat.
  • I decided to put the tomatoes, mushrooms, onions and chicken together in a bowl. I added about 1 tsp to 1 Tbsp Basalmic Vinegar and mixed around. (The approximate on the vinegar because I just dumped some in.) After all was mixed around then I put on top of the cheese, trying to keep as much liquid in the bowl as possible.
  • Then put back in oven and cooked until crust is brown and cheese is all melted.
  • These directions were inspired from the recipe below.

The second recipe was a real winner in my book. It is a non-traditional pizza that I fell in love with at Izzy's Restaurant. I wanted to find a recipe to make it and this is what I found. I love it. I was trying to think of a different pizza that I had the stuff for already in the house. I was asked to take a pizza to a funeral dinner. I thought that was kind of weird at first, but it was for a teenager, down-syndrome boy in the ward. His favorite food was pizza and ice cream, so they had pizza and an ice cream bar for the dinner. It was a hit. I heard several people comment that they would like to have pizza for their funeral. I wouldn't mind that at mine either. PS - I was hoping to bring some of the pizza home, but it was gone towards the beginning. It was very popular. DH even had 4 pieces and he doesn't like fresh tomatoes. Sorry - didn't get a picture of this one.

Artichoke-Tomato Pizza

From The New American Heart Association Cookbook, 7th Edition

Serves 6

Ingredients
Vegetable oil spray
1 refrigerated pizza crust in tube can
4 ounces part-skim mozzarella cheese or fat-free mozzarella-flavor soy
cheese, shredded
2 tablespoons grated Parmesan or Romano cheese
3 medium Italian plum tomatoes, chopped
8-ounce package frozen artichoke hearts, thawed, drained, and chopped
1/2 cup thinly sliced red onion
1 teaspoon balsamic vinegar
1 medium garlic clove, minced
1/2 teaspoon salt-free Italian seasoning, crumbled

Directions
Preheat the oven using the pizza crust package directions. Line a baking sheet with aluminum foil. Lightly spray the foil with vegetable oil spray. Spread the pizza crust on the foil. Bake for 7 minutes. Sprinkle the mozzarella and Parmesan over the crust.

In a medium bowl, stir together the remaining ingredients except the Italian seasoning. Arrange the mixture on the cheese. Sprinkle with the herb seasoning. Bake for 8 to 10 minutes, or until the cheese is bubbly.

Nutrition Analysis (per serving)
Calories 227; Protein 12 g; Carbohydrates 30 g; Fiber 4 g; Sugars 5 g; Cholesterol 15 mg; Total Fat 7.0 g; Saturated Fat 3.0 g; Polyunsaturated Fat 0.0 g; Monounsaturated Fat 0.5 g; Sodium 527 mg

Dietary Exchange
1 1/2 Starch; 1 Vegetable; 1 1/2 Medium-Fat Meat

This recipe is reprinted with permission from The New American Heart Association Cookbook, 7th Edition, Copyright © 2004 by the American Heart Association. Published by Clarkson Potter/Publisher, a division of Random House, Inc. Available at booksellers everywhere.


Posted by Picasa