Monday, October 19, 2009

Spinach/Carrot Brownies

Spinach and carrots in brownies? Sounds gross, but is remarkably good!


Ingredients

  1. 3 oz. semisweet or bittersweet chocolate
  2. 1/2 c. carrot puree
  3. 1/2 c. spinach puree
  4. 1/2 c. firmly packed brown sugar
  5. 1/4 c. unsweetened cocoa powder
  6. 2 T. trans-fat-free soft tub margarine spread
  7. 2 tsp. vanilla
  8. 2 large egg whites
  9. 3/4 c. oat flour or all-purpose flour
  10. 1/2 tsp. baking powder
  11. 1/2 tsp. salt

Directions

  1. Preheat oven to 350
  2. Spray an 8x8 baking pan with cooking spray
  3. Melt the chocolate in double boiler, over low flame, or in microwave (according to package directions)
  4. In a large (deep) bowl, combine the melted chocolate, vegetable purees, sugar, cocoa, margarine and vanilla. Whisk 1-2 mins, or until smooth and creamy.
  5. Whisk in egg whites
  6. Stir in flour, baking powder and salt with a wooden spoon.
  7. Pour batter into pan.
  8. Bake 35-40 mins, or until toothpick inserted in center comes out clean.
  9. Cook completely before cutting.

Saturday, October 17, 2009

French Toast Sticks

We made this for a freezer meal and BJ and I fell in love with the recipe. It is SO GOOD. We've made it several times since then and it rarely makes it into the freezer.

Ingredients:

10 slices thick-cut bread
1/4 cup butter, melted
4 eggs
1/3 cup sugar
2/3 cup milk
1 tsp vanilla
1/4 tsp cinnamon
pinch salt


  • Preheat oven to 350ºF.
  • Cut the thick bread slices into thirds.
  • Combine remaining ingredients in a mixing bowl, beat well to combine.
  • Dip bread sticks into the egg mixture one at a time, and place on a baking sheet that has been sprayed with cooking spray.
  • Bake in a 350º oven for about 30 minutes.
  • Flip the sticks over halfway through baking time to crisp both sides.
  • To freeze, allow to cool completely before wrapping well in a freezer bag.
  • To serve: pop in a 350 oven for about 8 minutes to refresh. Alternatively, they can be reheated in a microwave for a minute or two, but they will lose their crispness.
Recipe courtesy of Once a Month Mom and Erika at tummytreasure.com

Tuesday, October 6, 2009

Mozzarella Stuffed Red Peppers


This is one of BJ's favorite dishes. On a scale of 1-10, he once ranked it as a 9.5. That's equivalent to Cafe Rio, folks. (I'm not quite as of fond of it, though, so it doesn't get made often. But it's still good.)

Ingredients:
4 red bell peppers
3 T. olive oil, divided
2 cloves garlic, finely chopped
1 1/4 c. cherry tomatoes* (from a 1-pint container)
4 1/2 oz. mozzarella cheese, cubed*
1/4 c. finely shredded fresh basil
1/8 tsp. salt
1/8 tsp. pepper
1/4 cup prepared pesto sauce (if you can't find it prepared, look for a mix in with the gravy mixes)
1 T. lemon juice

  1. Preheat oven to 475.
  2. Spray a small roasting pan with nonstick cooking spray. (A 9x9 or smaller. You'll want your peppers to be able to stand up in it. You don't want it too big else they fall over.)
  3. Slice the tops off the peppers (keep these!) and deseed. Stand them upright in the prepared pan. If needed, trim the bottom of the peppers so that they sit flat.
  4. Bake 20 minutes, or until softened.
  5. Meanwhile, place bell pepper tops on a baking sheet.
  6. Combine garlic and 1 T. oil in a medium bowl.
  7. Toss the tomatoes in the garlic mixture and place on baking sheet with the pepper tops.
  8. Bake next to the pepper bases for the last 10 minutes of their baking time.
  9. Take peppers and tomatoes out of oven. (Do not turn off oven!)
  10. Put tomatoes in a large bowl with the mozzarella cubes, basil, salt and pepper.
  11. Stir until combined.
  12. Spoon tomato mixture into peppers and replace tops.
  13. Put peppers back into oven until the cheese has just melted, about 5 minutes. (You can turn off the oven after this.)
  14. Meanwhile, combine the pesto sauce, lemon juice and 2 T. olive oil in a small bowl.
  15. Transfer peppers to a serving platter.
  16. Drizzle with pesto sauce.
  17. Serve hot and enjoy.
*I find these measurements to be an estimate. If you have larger peppers, you'll need a bit more to fill them up. If you want to add more, go for it.

Recipe based off Great American Recipes: Easy Everyday Cooking

Thursday, September 24, 2009

Yellow Squash Mac 'n Cheese

This is a great way to sneak veggies into your kids' dinner.


Ingredients:

2 c. macaroni
1/3 c. magic mix
1/2 c. water
1 c. yellow squash puree*
1 1/2 c. cheddar cheese, grated
4 oz. cream cheese
1/2 tsp. salt
1/2 tsp. pepper
1/8 tsp. paprika


  1. Boil macaroni according to package directions. Drain.
  2. Meanwhile, combine magic mix and water in saucepan. Whisk rapidly over medium heat until it starts to bubble and thicken. (If you don't keep whisking, your flour will start to cook and you'll get chunks.)
  3. Add squash puree, cheddar cheese, cream cheese, and seasonings.
  4. Stir until the sauce is smooth and cheeses are melted.
  5. Stir in macaroni and serve warm. (You could also stir in diced tomatoes.)

*Yellow squash is, as my aunt calls, yellow zucchini. To puree it, cook it by either steaming it (healthier) or boiling it. When it's tender, stick it in a blender and puree it.


In other funtimes, if you serve with beets, you can write your name on your plate with the corner of it.


Magic Mix

This recipe is a base for many other recipes. I found it on the blog Everyday Food Storage and she uses it in many of her other recipes that I'm trying out. So you'll probably see it in some of the recipes I post on here.

Ingredients:
2 1/3 c. powdered milk*
1 c. all-purpose flour
1 c. (2 sticks) room-temperature butter or margarine (not spread!)

  1. Combine powdered milk, flour and butter in a large bowl. (I highly recommend a KitchenAid or the like. Use the beater attachment. Looks like a giant whisk.)
  2. Mix until it has the same texture as cornmeal. (Start slow and build up speed lest you end up with powder all over your kitchen.)
  3. Keep mix tightly covered in the fridge.

*This is for non-instant powdered milk. It's the stuff you can get at places such as the LDS canneries. If you use instant powdered milk like you get at the grocery store, you'll need to double the amount of powdered milk. You can tell the difference because non-instant has the same texture as flour whereas instant powdered milk are in tiny little balls.

Food Storage

I've recently started to research food storage. Specific to this blog is my attempt to use food storage in cooking, so that I can a) know how to cook with food storage when the time comes and b) be able to rotate through my food storage. So any recipe that uses at least one food storage item will be tagged with "Food Storage Rotation." Enjoy!

Tuesday, September 22, 2009

Banana Bread

1.5 c. flour
1.5 tsp baking powder
1/4 tsp baking soda
1/4 tsp. cinnamon
1/8 tsp. salt
1 egg (or 2 T. powdered egg + 1/4 c. water)
1 c. mashed bananas (3 medium)
3/4 c. sugar
1/4 c. cooking oil (or 1/4 c. pureed navy beans)
1 tsp. finely shredded lemon peel (optional)
1/2 c. chopped walnuts, pecans or chocolate chips (optional)


1. Preheat oven to 350. Grease the bottom and 1/2 inch up the sides of a loaf pan.
2. In a medium bowl, combine flour, baking powder, baking soda, cinnamon and salt. (If using powdered egg, add here.)
3. Make a well in the center. Set aside.
4. In another bowl, combine the egg, bananas, sugar, oil, and lemon peel. (If using powdered egg, add water here.)
5. Add egg mixture to dry mixture.
6. Stir until just moistened. Batter should be lumpy.
7. Fold in nuts or chocolate chips.
8. Spoon into prepared pan.
9. Bake 55 minutes or until toothpick inserted in center comes out clean.
10. Cool in pan on wire rack 10 minutes. Remove from pan and cool completely on rack.
11. Wrap and store overnight before slicing. (But I never do.)

Wednesday, August 26, 2009

Stroganoff Stromboli

I had made some bread and was in much need of a meal for supper. I was at a loss, until I saw a zucchini on the cupboard and an unmolded loaf of bread dough. My first thought was Stromboli but what to put in it - that was the million dollar question. I didn't have the typical pizza toppings that Stromboli usually calls for so I had to improvise and make up my own recipe.

Stroganoff Stromboli
1 loaf of uncooked bread dough
1 lb hamburger, cooked
1/2-3/4 cup onion, coarsely chopped
2 cups cubed zucchini
2 cloves garlic
1 can cream soup
1/3 - 1/2 cup sour cream
1/2 lb grated cheese
lemon pepper to taste
egg white (optional)
sesame seeds or poppy seeds (optional)

Roll out dough to fit a cookie sheet, set aside. Cook hamburger, drain grease and add zucchini, onion, garlic, sour cream and lemon pepper. Put half of the grated cheese on rolled out dough, layer with hamburger mixture, then add rest of cheese. Leave enough dough on one side to fold over top, put the mixture to the edge of the other side of the dough. Roll up dough and mixture from the side that has the mixture to the edge. When all rolled up, carefully roll whole loaf over until seam is on the bottom. Make 1/8 inch slits on top. Paint gently whipped egg whites on top and sprinkle with sesame seeds or poppy seeds. This last step is optional. I thought of it after it was already in the oven and wished I would have done it.

Bake at 350 for 30-40 minutes. Let sit for 10-15 minutes before serving. Makes about 7-8 servings, depending on the thickness of the slice.

Family Ranking: 8.8 (5 people voted) I guess that means we will make it again.

Monday, August 10, 2009

Taco Seasoning

6 tsp. chili powder
5 tsp. paprika
4 1/2 tsp. cumin
3 tsp. onion powder
2 1/2 tsp. garlic powder
1/8 tsp. cayenne pepper

Mix. Season to taste. (I use approximately 3 tsp. per pound of hamburger)

Tuesday, June 23, 2009

Momma Lovell's homemade bread


In a microwave-safe bowl combine:
  • 3 c. milk (can be substituted with water for very little flavor/texture difference, as we learned on accident.)
  • 9 T. shortening
  • 4 T. sugar
  • 2 T. salt

Microwave until shortening is melted. Let sit for a few minutes.

In KitchenAid mix:
  • 2 c. water
  • 2 T. yeast
  • 4 T. sugar
  • 4 c. flour
Let sit until mixture starts to grow (about 5ish minutes).

Alternately add shortening mixture and 7 cups flour to the yeast mixture. (Flour measurement is an estimate. Add until the dough starts to pull away from the side of the bowl.) Let knead for 5 minutes.

Cover with towel and let rise for 1 hour.

Split into 5 small loaves (if you have small loaf pans. Probably 3ish normal sized pans). Roll into an elongated oval with a rolling pin (to get out air bubbles), then roll up like you would do a cinnamon roll. Pinch the seam together and fold in the ends. Place in a greased loaf pan.

Let raise (covered with a towel) in loaf pan until approx. the size you want. Then place in a preheated oven (350 degrees) and bake for 35 minutes, or until golden brown on top.

Immediately remove from pan and place on a cooling rack or a towel and butter the top of the loaves.

***Note: This recipe did not fit in my KitchenAid. To compensate, we split the recipe in half. While the dough of the first half was kneading, I started the microwaving the stuff for the second half. I let the first half start to raise in a separate bowl and immediately put the stuff in the KitchenAid for the second half. When it was done kneading, I added it to the bowl with the first half in it, and briefly kneaded the two together, then let them rise together.


Recipe courtesy of Mom Lovell

Brownies (with Symphony variation)

These are my favorite brownies in the world. They're really rich and moist and chocolaty.

Ingredients:
  • 1 2/3 c. granulated sugar
  • 3/4 c. butter or margarine, melted
  • 2 T. water
  • 2 large eggs
  • 2 tsp. vanilla extract
  • 1 1/3 c. all-purpose flour
  • 3/4 c. NESTLE TOLL HOUSE Baking Cocoa (yes, I got the recipe off the back of the cocoa box)
  • 1/2 tsp. baking powder
  • 1/4 tsp. salt
Instructions:
  • Preheat oven to 350. Grease a 9x13 baking dish.
  • Combine dry ingredients.
  • Mix in wet ingredients.
  • Spread into prepared pan.
  • Bake for 18-25 minutes, or until toothpick inserted in center comes out slightly sticky.

My favorite variation:
  • Spread half of batter into pan.
  • Lay three 1-lb Symphony bars across the top.
  • Spread rest of batter on top. It will barely be enough to cover.
  • Sprinkle top with crushed toffee bits.
  • Bake as directed above. (Note: the toothpick will come out with melted chocolate on it from the candy bar. Only stick in partway to test for doneness.)
  • Let cool completely, else the melted chocolate may burn your mouth, or at the very least, run all over everything.

Friday, June 19, 2009

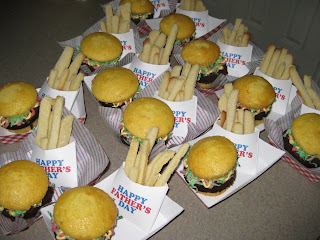
Cupcake burger and cookie fries

I stole this idea from Bakerella, I'll admit. Heck, I'll even give her all the credit. The woman is brilliant. But since I ended up doing half of mine from scratch and she did hers from a mix, I figured I'd put the recipes I used on here, just in case you, like me, want to make these, but don't have all the mixes nor time/resources to go to the store to buy some.


Sugar Cookie Fries. Note: Sugar Cookie dough needs to be refrigerated when not being used. This recipe made 3 cookie sheets worth of fries for me, but you can have one batch out of the fridge at a time, else it gets too soft to work with.

Brownies

Cupcakes:
I used a mix. But was going to use this recipe.

Frosting:
Store-bought. For the record, regular red food coloring (the cheap stuff most people have) doesn't make red frosting. It makes pink frosting. Pretend it's fry-sauce instead?

Lettuce:
Coconut colored with green food coloring.


For full instructions, be sure to visit Bakerella's blog. And make sure to print off the boxes and papers; they just make all the difference in the world.

Thursday, June 4, 2009

Pizza Recipes


Here is a very yummy recipe for Garlic Chicken Pizza.

"This is a recipe that is used at the Papa Murphy's take-and-bake pizza chain. This is just like the original and oh so tasty."

Sauce
  • 1 Cup of Ranch dressing
  • 1 Tablespoon of minced garlic (garlic in a jar is perfectly fine)
Toppings and Crust
  • 1 Cup of cooked, diced chicken
  • 1/2 of a red onion (cut in rings)
  • 1/2 of a tomato (chopped)
  • 1/2 a cup of sliced mushrooms
  • 1 cup of mozzarella cheese (shredded)
  • 1 pizza crust (store bought or homemade)
Directions
  • Mix the ranch and garlic together and put on the crust
  • Top with chicken, onion, tomato, mushrooms, and cheese
  • Bake at 350 degrees for 15 minutes or until crust is done and cheese is melted
  • Top with Parmesan cheese
My Additional Directions
  • I put the sauce on the half cooked pizza crust and then topped with cheese. Putting the cheese on first helps keep the toppings all in place as there is liquid in the tomatoes. Otherwise, they would just slide off your pizza when you picked it up to eat.
  • I decided to put the tomatoes, mushrooms, onions and chicken together in a bowl. I added about 1 tsp to 1 Tbsp Basalmic Vinegar and mixed around. (The approximate on the vinegar because I just dumped some in.) After all was mixed around then I put on top of the cheese, trying to keep as much liquid in the bowl as possible.
  • Then put back in oven and cooked until crust is brown and cheese is all melted.
  • These directions were inspired from the recipe below.

The second recipe was a real winner in my book. It is a non-traditional pizza that I fell in love with at Izzy's Restaurant. I wanted to find a recipe to make it and this is what I found. I love it. I was trying to think of a different pizza that I had the stuff for already in the house. I was asked to take a pizza to a funeral dinner. I thought that was kind of weird at first, but it was for a teenager, down-syndrome boy in the ward. His favorite food was pizza and ice cream, so they had pizza and an ice cream bar for the dinner. It was a hit. I heard several people comment that they would like to have pizza for their funeral. I wouldn't mind that at mine either. PS - I was hoping to bring some of the pizza home, but it was gone towards the beginning. It was very popular. DH even had 4 pieces and he doesn't like fresh tomatoes. Sorry - didn't get a picture of this one.

Artichoke-Tomato Pizza

From The New American Heart Association Cookbook, 7th Edition

Serves 6

Ingredients
Vegetable oil spray
1 refrigerated pizza crust in tube can
4 ounces part-skim mozzarella cheese or fat-free mozzarella-flavor soy
cheese, shredded
2 tablespoons grated Parmesan or Romano cheese
3 medium Italian plum tomatoes, chopped
8-ounce package frozen artichoke hearts, thawed, drained, and chopped
1/2 cup thinly sliced red onion
1 teaspoon balsamic vinegar
1 medium garlic clove, minced
1/2 teaspoon salt-free Italian seasoning, crumbled

Directions
Preheat the oven using the pizza crust package directions. Line a baking sheet with aluminum foil. Lightly spray the foil with vegetable oil spray. Spread the pizza crust on the foil. Bake for 7 minutes. Sprinkle the mozzarella and Parmesan over the crust.

In a medium bowl, stir together the remaining ingredients except the Italian seasoning. Arrange the mixture on the cheese. Sprinkle with the herb seasoning. Bake for 8 to 10 minutes, or until the cheese is bubbly.

Nutrition Analysis (per serving)
Calories 227; Protein 12 g; Carbohydrates 30 g; Fiber 4 g; Sugars 5 g; Cholesterol 15 mg; Total Fat 7.0 g; Saturated Fat 3.0 g; Polyunsaturated Fat 0.0 g; Monounsaturated Fat 0.5 g; Sodium 527 mg

Dietary Exchange
1 1/2 Starch; 1 Vegetable; 1 1/2 Medium-Fat Meat

This recipe is reprinted with permission from The New American Heart Association Cookbook, 7th Edition, Copyright © 2004 by the American Heart Association. Published by Clarkson Potter/Publisher, a division of Random House, Inc. Available at booksellers everywhere.


Posted by Picasa

Friday, April 17, 2009

Homer April 15-22 Menu

Since lunch is basically leftovers or Pasta Roni every day, I'm gonna stop listing them.

Wednesday: Ward Closing Social - pizza
Thursday: Graduation Celebration - pizza and cheeseburgers
Friday: Fajitas
Saturday: Beef Stew
Sunday: Cousins' dinner
Monday: Pull Apart Pizza
Tuesday: Chicken Alfredo

Cornbread

Ingredients
  • 1 cup flour
  • 2 cup cornmeal
  • 2-4 tbsp sugar
  • 1 tbsp baking powder
  • ½ tsp salt
  • 2 eggs
  • 1 cup milk
  • ¼ cup oil or shortening, melted
Directions
  • In a mixing bowl stir together flour, cornmeal, sugar, baking powder, and salt.
  • In another bowl beat together eggs, milk, and oil.
  • Add to flour mixture and stir just till batter is smooth (do not overbeat).
  • Pour into a greased 9x9x2 inch baking pan.
  • Bake in a 425 oven for 20-25 minutes or till golden brown.
  • Makes 8 or 9 servings
Recipe courtesy of Jalin Bingham

Stroganoff

Ingredients
  • Hamburger
  • Onion
  • Cream of Mushroom soup
  • Garlic salt
  • About 1 cup sour cream
  • Salt
  • Pepper
  • 1/2 tsp. paprika
Directions
  • Brown the beef.
  • Add onions and cook.
  • Drain.
  • Add cream of mushroom soup and sour cream.
  • Heat the mixture.
  • Add garlic salt, salt, pepper, and paprika

Serve over cooked egg noodles or mashed potatoes.

Recipe courtesy of Carol Homer

Strawberry Jam

I bought a flat of strawberries this week, so I'm doing a bunch of cooking this week with strawberries. Today? Strawberry jam! This recipe doesn't have pectin, so I was a little worried about it setting up, but I think it turned out well. It takes 48 hours to set up properly, so I guess we'll find out.


Ingredients
  • 2 pounds fresh strawberries, hulled
  • 4 cups white sugar*
  • 1/4 cup lemon juice

Directions
  • Blend strawberries. You should get about 4 cups.
  • In a heavy-bottomed saucepan, mix strawberries, sugar, and lemon juice.
  • Stir over low until the sugar is dissolved.
  • Increase to high and bring the mixture to a full rolling boil. (Increase temperature a little at a time to prevent it from boiling over.
  • Boil, stirring often, until the mixture reaches 220 degrees F (105 C). (About 15 minutes. Read below for tips how to tell if it's ready.)
  • Transfer to hot sterile jars, leaving 1/4 to 1/2 inch headspace.
  • Seal. (One person said you could just turn the jars over for 5 minutes, then turning them back right-side up. I put them in a steamer canner for about 5 minutes. You can also use a water bath.)

To test for jelling
  • Place three plates in a freezer.
  • After about 10 minutes of boiling place a tsp of the liquid of the jam onto the cold plate.
  • Return to freezer for a minute.
  • Run your finger through the jam on the plate. If it doesn't try to run back together (if you can make a line through it with your finger) it's ready to be canned.

* For preservation purposes, a 1:1 ratio of fruit to sugar is preferable. Less sugar is fine, but it won't last as long. Because it only made two pints, and because I don't like as much sugar, I only put in 3 cups.

Recipe courtesy of All Recipes.

Saturday, April 11, 2009

Homer April 8-15 menu

Wednesday:
Dinner: Stir Fry
Thursday:
Lunch: Leftovers
Dinner: Stroganoff
Friday:
Lunch: Leftovers
Dinner: BYU graduate celebration
Saturday:
Lunch: Leftovers
Dinner: Fried Potatoes and Cornbread
Sunday:
Lunch: Pasta Roni
Dinner: Easter at BJ's parents
Monday:
Lunch: Leftovers
Dinner: FHE at Bonnie's
Tuesday:
Lunch: Leftovers
Dinner: Spaghetti
Wednesday:
Lunch: Leftovers

Thursday, April 2, 2009

Chicken Vegetable Soup

I hate getting recipes that aren't really recipes, but rather, "add enough sugar" and "until it looks good." I don't know enough about cooking to be able to figure it out on my own. I need step-by-step instructions. I need to know why I'm doing things, or be given specific instructions. If a recipe says "Bake 30-35 minutes" I need to know the, "or until [insert requirements here]." But when I'm given a more vague recipe and can actually make it, it makes me really proud of myself. In other words, I apologize for posting a vague recipe, but I'm really proud that I made it and that it tasted good. (Though, in future, I would add more spices than I did. I really just had no idea how much to add this time. Quantities! I need quantities!)


Ingredients:
  • 1 chicken carcass (I used the leftovers from the 40 Cloves and a Chicken)
  • Water
  • Onions
  • Celery
  • Carrots
  • Potatoes
  • Any other vegetable you want in your soup
  • Salt and Pepper
  • Basil
  • Oregano
  • Bay Leaf
Instructions:

So, I told my friend, Tyler, that I had never made soup from a carcass before. These are the instructions I got from him. (Anything in italics are my own additions from when I actually made it.)


  • Well, lucky for you that it's the easiest thing in the known universe
  • Take the carcass
  • Cut it in half lengthwise (if it will fit in your pot without cutting it in half, skip this step)
  • Put it in a deep pot
  • Fill pot with water (I used a 6 quart pot. He had me fill it half full of water.)
  • Add in a thickly-sliced onion, stalk of celery, and carrot
  • Boil until the cows come home (This translates as 4-6 hours)
  • ta da
  • Basically, what will happen is 1) all the chicken meat left on there will cook and fall off, 2) all the cartilage, connective tissue, etc. will break down into gelatin, which is amazing for thickening soups and is the trademark mouthfeel of a good stock, and 3) fill your house with awesome smells
  • Then after boiling for 4 to 6 hours (taste the broth to see if it has enough flavor to it. If it doesn't, take off the lid and let it evaporate some. Possibly add chicken bullion), you strain it all out (keep the liquid!), let the strained stuff cool off, and pull all the meat out of the rest of the mess (throw away the vegetables, too. They've already served their purpose.)
  • Plop it back into the liquid (If you need more liquid at this point, just add some more water.)
  • Then add in onions, celery ,carrots, potatoes, broccoli, squash, noodles, and pretty much anything else you want
  • Boil til it's all soft
  • Oh, and add in some oregano, a bit of basil, and a bay leaf. Also, salt and pepper to taste

Wednesday, April 1, 2009

Homer April 1-8 menu

Wednesday:
- Lunch: Hamburger and Rice leftovers
- Dinner: 40 Cloves and a Chicken

Thursday:
- Lunch: Hamburger and Rice leftovers
- Dinner: Chicken and Vegetable Soup

Friday:
- Lunch: 40 Cloves leftovers
- Dinner: Soup leftovers

Saturday:
General Conference - will be at BJ's parents' house

Sunday:
General Conference - will be at BJ's parents' house

Monday:
- Lunch: 40 Cloves leftovers
- Dinner: Shepherd's Pie (combined with another family)

Tuesday:
- Lunch: Various leftovers
- Dinner: Stir Fry

Wednesday:
- Lunch: Stir Fry leftovers


Ingredients on hand: olive oil, thyme, salt, pepper, carrots, hamburger, green beans, rice

Grocery trip for needed ingredients: $16.14 (See this post for shopping details, which include additional items not included in this price.)

Tuesday, March 17, 2009

Boston Cream Pie

This is one of my favorite desserts, one which I'm surprised at the number of people who have never tried it. It's actually quite easy, too.

photo courtesy of google and, apparently, this blog. Sorry, I forgot to take a picture of my own.

Ingredients:
  • 3 eggs, separated
  • 1 tsp. vanilla extract
  • 1 cup sugar, divided
  • 1/8 tsp. salt
  • 3/4 c. cake flour
  • 1 package (2 3/4 or 3 oz.) vanilla pudding mix (I use instant)
  • 1 1/2 c. milk
  • 3 Tbsp. light corn syrup
  • 2 Tbsp. water
  • 4 squares (4 oz.) semisweet chocolate, coarsely chopped.
Instructions
  1. Preheat oven to 350.
  2. Line a 9-inch round cake pan with waxed paper.
  3. Beat egg yolks and vanilla on medium speed until blended. Beat in 1/4 cup sugar until very thick and pale.
  4. Using clean, dry beaters, beat egg whites and salt with electric mixer until soft peaks form. Gradually beat in 1/4 cup sugar until stiff peaks form. (I use my KitchenAid for this step, and actually start it first. I let it run while I'm beating the yolk mixture with a hand mixer.)
  5. Fold yolk mixture into the whites.
  6. Sift flour over mixture. (If you don't have a sifter, use a fine-hole strainer. That's what I have and it works great.) Fold in gently. Do not overmix.
  7. Pour batter into pan.
  8. Bake until cake springs back when gently pressed, about 25 mins. (In my gas stove I bake it at just under 350 for 23 mins.) Be careful—the bottom will brown faster than the top, so don't overbake!
  9. Remove cake and place right-side-up on wire rack. Cool completely.
  10. While the cake is baking, combine pudding mix and milk in a saucepan and cook following package directions. (Instant pudding works just as well and doesn't require cooking.) Transfer to a shallow bowl; press plastic wrap on surface and refrigerate 30 minutes.
  11. Cut cake horizontally in half. Place bottom half on serving plate. Spread evenly with pudding. Place remaining half on top.
  12. Bring remaining sugar (1/2 cup), corn syrup and water to a boil in a saucepan over low heat, stirring constantly. (Warning: it takes 20-30 minutes (at least on my stovetop) for the frosting to come to a boil. I usually start it soon after I pull the cake out of the oven and let it cook while the cake cools. Also, If you turn up the heat for the frosting to cook faster, the frosting doesn't set up right and you end up with a pile of goo around the cake. Not nearly as good.)
  13. Remove from heat and add chocolate. Let stand for one minute. Whisk until smooth.
  14. Gradually pour over cake. Let stand until glaze sets. Note: the frosting will spill over the sides and you will have a slight pool around the cake.

Recipe based off one from Easy to Bake; Easy to Make.

Friday, March 6, 2009

40 Cloves and a Chicken

My friend, Michael, talked me into buying a whole chicken a few weeks ago while we were out grocery shopping, assuring me that I could find something to cook with it. BJ and I were in charge of a dinner group this week. Somehow, the two came together. I mentioned it to our friends, Tyler and Meagan, who informed us of the greatest recipe in the world for a whole chicken. So, being brave, I made it. Here I present the recipe!

First, cut up the chicken into 8 pieces. If you're like me and have no idea how to do that, see the steps on this site.

Here's my before cutting up chicken picture (I was really nervous to do this!)

Recipe:

And my after cutting up chicken picture:

Trust me. Cutting up the chicken is the hardest part of the whole recipe. But, in a way, it was kind of fun. Mostly because now, if I were starving and ran across a chicken and could figure out how to kill and pluck it, I would know how to cut it up to cook it. That means I'm cool.

Now, next step... the rest of the recipe!

Ingredients

  • Cut up whole chicken (in 8 pieces. I didn't include the two back portions of the chicken. I didn't wanna deal with pulling chicken off the ribs later.)
  • 1/2 cup plus 2 tablespoons olive oil
  • 10 sprigs fresh thyme (Apparently 6 small springs equals approx. 1 tsp dried. So I used just less than 2 tsp. dried thyme and it worked out just fine.)
  • 40 peeled cloves garlic
  • Salt and pepper

Directions

Preheat oven to 350 degrees F.

Season chicken with salt and pepper. Toss with a 2 tablespoons olive oil and brown on both sides in a wide frying pan or skillet over high heat. (Make sure said frying pan or skillet is also oven-proof!) Remove from heat, add oil, thyme, and garlic cloves. Cover and bake for 1.5 hours.

Remove chicken from the oven, let rest for 5 to 10 minutes, carve, and serve.


Before cooking:


After cooking:


After it's cooked, the garlic is really, really soft. Almost like unto butter. So we cut up some french bread and spread garlic over it and made garlic bread. It didn't taste quite like your normal garlic bread, but it was still quite tasty.

**Addendum: For the garlic bread, slice the bread, dip in the leftover oil from the chicken (which is infused with garlic), the broil until toasted. Place bread, garlic cloves, and salt on the table. Let each person spread their own garlic on the bread and add salt. We tried this the second time and it definitely tastes better.

Recipe courtesy of Food Network.

Tuesday, March 3, 2009

Chicken and Broccoli Casserole

Separate ingredients into three sections:

#1:
- 2 (10 oz.) pkgs. frozen broccoli, cooked (can be chopped) (I steamed one head of broccoli cut up into florettes.)

#2:
- 2 cans cream of chicken soup
- 1 c. mayonnaise
- 1 tsp. lemon juice
- 2 lbs. cooked chicken, cut up
(I seared the chicken, turned the skillet down, then added the rest and let it simmer until the chicken was cooked.)

#3:
- 3/4 c. sharp grated cheese
- 3/4 c. bread crumbs
- 1/4 c. melted butter (optional)


Alternate #1, #2, #3 in layers in 13 x 9 x 2 inch casserole. Top with crumbs. Optional - 1/4 cup melted butter poured over top. (Provides a crispier top.) Bake for 1 hour at 350 degrees.

Serving Suggestion: Serve over rice.


Recipe adapted from Cooks.com
Posted by Picasa

Monday, February 23, 2009

Pear Cinnamon Syrup

I am doing this mostly so that I can have a record of this recipe because I have to refigure it each year and I want to get rid of one extra piece of paper laying around the house. It was written down on a scratch paper so it can easily be thrown away. Plus, there are few others - won't mention any names - that have the same problem I do of not remembering what we had done the year before. So this is for their benefit also. This is a good use for over ripe pears.

Pear Cinnamon Syrup

20 cups pear juice (15 lbs whole pears)
15 cups sugar
1 cup corn syrup
3/4 cup red hots

Wash pears and cut them in quarters, you only need to get rid of the stem. Put in steam juicer and juice for 90 minutes. The time starts after it is all steamed up. Mix with the rest of ingredients and heat until candy and sugar are dissolved. If you would like to simmer it longer you will have thicker syrup, but less syrup. Process in water bath for 15 minutes for quarts.

Yields: 7 quarts of syrup

1 lb fruit = 1-2 cups juice

You can add more red hots if you like your syrup with a little more cinnamon taste.

The young women that helped me make this last year has found a new use for this syrup. She adds it to Wassail. I got my first taste of the Wassail yesterday, it was yummy - or as her Grandma put it - divine.

Now the next trick is to remember that when I need the recipe to look on the blog to find
it. :)

Sunday, February 15, 2009

So I lied

I lied, but not intentionally. We decided to do another meal today. It is one of Dad and Mom's favorite, but the kids are not fans of the spice. We made Red Curry Chicken and brussel sprouts. Yes, brussel sprouts - this is a favorite for the kids. Really, I am telling the truth about this subject. When we are in the store and they see the brussel sprouts. They drag us over so that we can get some. They get mad at the table if somebody gets more then they do. Sorry if the picture isn't the best. I forgot to take one and remembered when Dad went for seconds and was starting to eat before I could get the picture taken. It definitely tastes a million times better then it looks in the picture.

Red Curry Chicken

Heat until combined:
1 pkg (1.75 oz) (2 Tbsp) Taste of Thai Red Curry Base
1 can (13.5 oz) coconut milk
Add:
1 lb chicken (or raw shrimp is yummy also)
2 Tbsp sugar
1/2 green and pepper, sliced thin (we used green peas as we didn't have peppers)
1/2 cup fish sauce (we use soy sauce)
1/2 cup vinegar (optional, but it helps cut down on the salt taste of the curry and soy)

Cook until heated through (or if you are using raw shrimp, until the shrimp is cooked).
Add:
1 can (8 oz) bamboo shoots, drained
Fresh basil (Thai basil is the best)

(We didn't add the last 2 ingredients as we didn't have them, but they really add to the taste and texture of the finished product.)

Menu for the day

Today is Sunday so the menu is a lot more relaxed. We have breakfast and late lunch and then just snack for the rest of the day.

For breakfast we had homemade Grape Nuts
7 cups whole wheat flour
2 cups brown sugar
2 tsp baking soda
2 cups milk

Mix dry ingredients until all clumps from brown sugar are broken up. Then add milk, mix until no more flour in bowl. Crumble on cookie sheet and bake at 350 for 20 min. Crumble up baked dough and serve with milk. This is a family favorite.

For lupper (lunch / supper) we had spaghetti, green salad and garlic bread.

Nothing exciting but gives ideas for future meals. Our stomachs were filled and we were all content and happy after eating. If I ever get the recipe for the spaghetti sauce that was given to us I will post it. It was enjoyed by all.

Sirloin and Vegetable Skillet


Ingredients
2 Tbsp. olive oil, divided
1 lb. steak, cut into strips
2 cups (about 6 oz.) mushroms
1 medium red bell pepper, coarsely chopped
1 small onion chopped
1 pint (about 16 oz) whole kernel corn, drained
1/2 pint (8 oz) tomato sauce
2 tsp. Italian seasoning
1/8 tsp. crushed red pepper flakes.

Instructions
- Heat 1 Tbsp. oil in a large skillet over medium heat. Add steak and cook until browned, stirring occasionally. (About 5 mins.) Move steak to platter, discarding any fat.
- Heat 1 Tbsp. oil in the skillet. Stir in mushrooms, pepper, and onion. Cook until crisp-tender, about 5 mins.
- Put steak back in skillet, add corn, tomato sauce, Italian seasoning and red pepper flakes. Cook until heated through, stirring occasionally (about 2-3 mins).
- Serve and enjoy immediately.

(Tip: I would recommend putting this over rice and/or with a salad on the side. Also, perhaps, with bread.)

Recipe based on one in Great American Recipes

Tuesday, February 3, 2009

Rub-a-dub Chicken

I tried a recipe for a rub for chicken yesterday that was absolutely delicious, at least in my book. I have a couple kids that will beg to differ, but they don't like any spice to any degree - so they of course put in their two cents. But I would definitely use it again. I cut the chili powder in 4ths (so 1/2 Tbsp). And since our grill is put away for the winter, we just cooked it in the electric fry pan on about 300 degrees. It turned out great.

Rub-a-dub Chicken
(Family Fun)

An easy rub makes this chicken simply mouthwatering and forms a gorgeous crust during grilling. Make a batch of the spicy powder, store it in your cupboard, and use it all summer long to give your chicken an outrageous zing.

Rub:
1 tablespoon black pepper
2 tablespoons cumin
2 tablespoons chili powder
2 tablespoons brown sugar
1 tablespoon white sugar
1 tablespoon oregano
4 tablespoons paprika
2 tablespoons salt
3 tablespoons garlic powder
1 tablespoon celery salt
Chicken:
4 to 6 pieces boneless chicken thighs or breast halves
Barbecue sauce (for dipping)

1. Pour all the spices into a sandwich-size sealable plastic bag. Shake well. This mix can be stored at room temperature in the sealed bag for months -- and it makes enough rub to cover approximately 5 1/2 pounds of chicken.
2. To prepare your chicken, place a piece of chicken and 2 tablespoons of the rub (for a milder flavor, use less rub) in a gallon-size sealable bag. Give the bag a shake to cover the piece with the powder. Repeat, adding chicken and rub and shaking until all the chicken is in the bag and uniformly covered. (For a more intense flavor, refrigerate the bag of chicken for up to 1 hour before grilling.)
3. Grill the chicken over medium heat, on a covered grill, about 5 to 7 minutes per side or until the meat is no longer pink on the inside. Arrange the pieces neatly on a dinner plate and cover tightly with aluminum foil. Let sit for at least 10 minutes (very important!). Serve with barbecue dipping sauce. Serves 4 to 6.

Friday, January 30, 2009

Enchiladas


8 flour tortillas (I use the smaller size)
3 chicken breasts, cooked and cubed into small pieces
2-3 cups grated cheese, cheddar or Mexican blend
1 medium onion, chopped
1 can olives, sliced
1 1/2 cups of your favorite salsa
8 oz. sour cream
1 can cream of chicken soup
Save some of the cheese, olives and onions for the top of casserole. Combine chicken plus remaining cheese, onion, and olives. Fill tortillas with a scoop of the mixture & roll up. Lay seam-side down, side by side, in 9" X 13" pan. Mix salsa, sour cream and soup. Spread over tortillas. Top with reserved cheese, olives and onions. Bake at 350 degrees until heated through (20-30 mins.) (Option: I lighten up the recipe a little by using "light" sour cream and "healthy request" cream of chicken.)


Recipe from Carol Homer

Breaking Rules

Ok, I'm breaking my own rules. I'm pregnant; I can do that. :) So from now on, I'm just blogging recipes and pictures as I make them; no matter if they're in a weekly menu or not. Maybe then I'll actually use this blog.